How can I put my squad's name and logo on vehicles in
OFP?
OFP palyer RN Malboeuf provides the following
detailed instruction you'll need in order to get your squad
logo to show up on vehicles in multi-player games:
- Don't use the publicly available program that
automates this procedure for you. It requires the German version of Visual Basic
DLL files to make it run properly.
- From OFP's main menu, click on where your
player name is displayed on the upper left-hand corner. This will display
the SELECT PLAYER menu.
- From the SELECT PLAYER menu, either click on
NEW to add a new player name for multi-player games or select an already
defined player name and click on EDIT. This will take you to the NEW PLAYER
or EDIT PLAYER screen, depending on the menu option you clicked on.
- Whatever player name you decide to use, make
note of the name's exact spelling now. From the NEW PLAYER or EDIT PLAYER
screen, you can modify your player's face and voice models but that is
not relevant to the squad logo setup.
- In the upper left-hand corner of the NEW
PLAYER or EDIT PLAYER screen you'll see the PLAYER NAME field. Just below
where the player name is entered is your unique player ID number. Write it
down now. This number will always be the same for any player names you define
using your CD's installation of OFP.
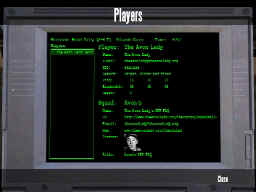
- In the lower right-hand corner of the NEW
PLAYER or EDIT PLAYER screen you'll see a SQUAD URL field. You must specify
here the full URL of your squad's SQUAD.XML page. As an example, if you
belong to a squad named The OFP FAQ Squad, you might enter a URL similar to
this: http://www.theavonlady.org/theofpfaq/squadxml/squad.xml
(try the link - it works). Check with your squad's WEB master
or administrator to get the exact URL. Everyone in your squad should be
specifying the same URL in their OFP installation's SQUAD URL field.
- Click OK to save your changes. Quit OFP
from OFP's main menu.
- The previous steps should be performed by
each member of the squad. The remaining steps are to be performed by the
squad's WEB master or administrator. Download this
file. It contains all the files you'll need to place on your squad's WEB
site to support your squad logo's display. Extract the files to a folder on
your PC.
You will only have to edit the SQUAD.XML file and replace the enclosed
sample logo file with your squad's own.
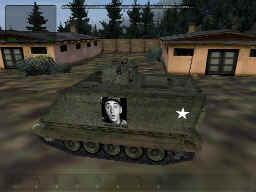
- Use your favorite graphics editor to create
your squad logo picture file. The logo file must be a non-progressive (zero
progressive passes) 32x32, 64x64, 128x128 or 256x256 pixel 24 bit color JPG file with
a maximum of 300 pixels per inch. The logo can contain transparent color.
Read more about that here.
- Using your favorite text editor, open
the SQUAD.XML file. If you're not comfortable editing WEB page code, you
might want someone who is to assist you with this. If you make any mistakes,
you can always extract a fresh copy of the SQUAD.XML file. Towards the top of the
file, you'll find the squad properties section, as follows:
<!-- Squad properties follow - change values as necessary -->
<!-- Keep nick short - it is displayed together with players nick -->
<squad nick="745th">
<!-- Main squad name, also page title when XML is viewed in web browser -->
<name>745th Operation Flashpoint Squad</name>
<!-- Squadmaster email address -->
<email>[email protected]</email>
<!-- Main web site of the squad -->
<web>www.fpSquad745.com</web>
<!-- Squad picture URL (will be documented later) -->
<picture></picture>
<!-- Squad name - displayed on vehicles manned by squad members -->
<title>745th AT Squad</title>
<!-- End of squad properties -->
Sample values in blue text, above and below,
should be modified accordingly.
Read the comments in the squad properties
section above and change all the sample information given for a squad called the 745th
to the correct information for your squad. In the <picture>
statement, specify only the file name of the logo file you will be using. You
must not specify the logo file's directory or folder name. For example, if you were
to use the enclosed LOGO.JPG file, you would simply specify:
<picture>logo.jpg</picture>
The logo JPG file must reside in the same
directory that the remaining squad logo related files will reside in.
- After the squad properties
section comes the squad member list. In the enclosed SQUAD.XML file, there
are four sample member entries. Each member entry consists of the following
lines:
<member id="125685"
nick="Jonny">
<!-- additonal information about this member, accessible by pressing 'P' -->
<!-- all this information is optional and may be set to N/A -->
<!-- Full name -->
<name>Jonny Bunny</name>
<!-- E-mail address -->
<email>[email protected]</email>
<!-- ICQ number -->
<icq>N/A</icq>
<!-- short description -->
<remark>Skilled heavy AT soldier.</remark>
<!-- end of additional member information -->
</member>
What's most important here is the first line
of the member entry. For each member entry, make sure that the player ID
numbers and the player nicknames are specified exactly as they were defined
in each squad member's OFP installation, as was discussed in the first steps of
this procedure, above.
Define member entries for each squad member.
If any of the sample member entries remain in SQUAD.XML, delete them.
Save all changes made to the SQUAD.XML file.
- Upload the edited SQUAD.XML file,
the squad logo JPG file and the remaining 2 files, SQUAD.DTD and SQUAD.XSL, to
the same folder on your squad's WEB site.
Now when squad members play a multi-player game, you should see the squad logo
on vehicles when they are occupied by your squad mates. An exception to this would be a multi-player game where
two players from different squads are in the same vehicle. Another exception
would be when your squad's WEB site is inaccessible for some reason.
During a multi-player game, if you hit the letter "P" key on your
keyboard, OFP will display the list of member entries that were defined on the
SQUAD.XML page.